
The Macintosh Guy || MacTips || Email Lists || My Blog
Tip#11
Hard Drive Partitioning, Part(ition) 2
How.
Last week I covered Hard Drive Partitioning, Part(ition) 1, What and Why. This week is the continuation of partitioning. If you missed last weeks MacTip, check out the MacTip of the Week Archive. This week I'll cover deciding in what configuration to partition your drive, and how to do it with some of the popular hard disk utilities.
Sometimes the most difficult thing about partitioning a hard drive is deciding how many partitions, and what size to make them. Within reason the only limits are common sense and ease of use.
Where to start? Most people who are to the point of partitioning a drive are either replacing an older, smaller drive or are adding to the one you have. Either way, you have some sort of idea how you use your Mac and what files you have stored in different folders in your hard drive.
Generally the first place I'll look when I'm helping someone figure out how to partition their drive is the first level of their current hard drive. Most people have already separated their drive into sections by the folders on the first level of their hard drive. Almost everyone will have; a System Folder (contains all the files for running your Macintosh), an Applications folder (contains all your programs like Photoshop, Quicken, ClarisWorks, etc.), a Documents Folder (for the files you create), and a Miscellaneous folder (for the games, and other things that don't go into either of the other folders). Looking at these folders gives us a place to start.
The System Partition... 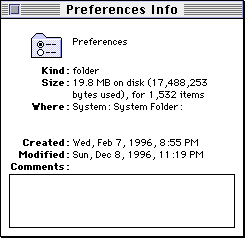 First I'll get information on the System Folder (click on it once, then go under the File menu to 'Get Info...'). This will tell you some basic information about any folder that you select.
I chose my preferences folder to illustrate what we are looking at. Notice my Preferences folder's Size: says "19.8 MB on disk (17,488,253 bytes used)". The first number is the amount of actual disk space the files in the folder cover. The second number is the size of the actual files themselves.
Note: Last weeks tip explains why there is a difference between the amount of disk space a file takes up and the size of the file itself.
When you get info on your System Folder write down the number of bytes used. Divide this number by 1,000,000 and you will have roughly the number of megabytes your System folder takes up. Mine weighs in at right about 85 MB. The next thing I'll do is take this number and double it to figure out roughly how large to make my first partition. I usually end up making the system partition somewhere close to 175 MB. This allows enough room for anything I might want to add to my System and I don't have to worry about being short on space.
The Application Partition... The next place I'll look is at my Applications folder. I'll get info on it just like I did on the System Folder (click on it once, then go under the File menu to 'Get Info...'). Once I get the size of this folder I try to think about what applications I may want to be adding in the foreseeable future. this can be a difficult one to guess but remember a single application can require anywhere from 5 to 50 megabytes or more. Usually this means I'll add at least 100 MB to my current applications folder size to leave me some growing room.
The Documents Partition... The third folder I'll examine is the documents folder. Getting info on it, like the others can give you a good idea for a starting point. A lot depends on the kind of files you create. If the only files you save to your hard drive are letters to grandma you need not leave yourself hundreds of megabytes free for your documents. However if you are constantly creating 30 megabyte Photoshop files you may need to have a few hundred megabytes of free space in which to save those files.
Other Partitions... After the first three partitions, the rest depends on how you use your Mac. The same factors that make partitioning a good idea also help us decide how to do it.
Remember the adage from last week? Big files, big partitions, small files, small partitions. If you work with many small files, you will want to make smaller partitions to hold those files. If you primarily work with large files you will want larger partitions to hold those files.
Specialized Partitions... You may also want to create partitions for special purposes. Creating a single partition for your web browser's cache files can help keep them in order and they won't contribute to fragmentation (sorry to throw that word out there, we will cover it in a future tip). Having a separate partition for either your virtual memory storage file (you select where it goes in the Memory control panel) or your Photoshop scratch disk can ensure that there is always an open space on your drive for that information.
I use a single 30 megabyte partition that I use for downloading files into so I can expand and look at them without having them get mixed up with my other files. If it turns out to be something i want to keep long term I just copy it to one of the other partitions.
Really the only single thing that dictates how to partition your drive is you and how you use your Mac.
The Tools!
![]()
![]()
![]()
![]()
![]()
There are a number of utilities that are used in formatting and partitioning hard drives. The most popular tools (in my opinion) are shown above. Apple HD SC Setup is currently at version 7.3.5 and is only for use with older drives primarily on non-PowerMacs. Drive Setup, HD SC Setup's big brother is currently at version 1.0.5, and is used for all Apple hard drives on newer Apple Macintosh computers. Neither of these will work on non-Apple drives.
The other three are the ones that I have had the most contact with and seem to cover most of the Macintosh hard drive market. Silverlining comes with any LaCie hard drive and the current version is at least 5.7. Hard Disk Toolkit from FWB Software, Inc. is bundled with many of the Mac clones and is also commercially available. They recently came out with version 2.0 (I currently only have 1.8). The last of the three is APS PowerTools which uses the CharisMac driver. PowerTools comes with any drive purchased from APS Technologies and is currently at version 4.07.
I'll briefly show how partitioning works with each one and go into more depth with Drive Setup from Apple because it is still the most common.
Silverlining...
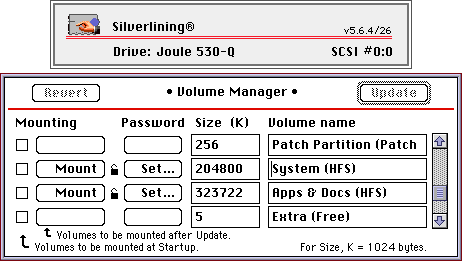
For me Silverlining seemed the least intuitive, if you are using it to partition your drive I suggest you make sure you have the latest version and read the manual carefully.
Hard Disk Toolkit...
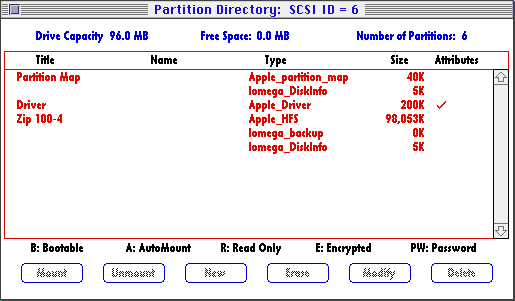
HDT provides you with the dialog above when you click the partition button. HDT will let you select a partition, (the Apple_HFS one is the one that holds your data) and click the modify button to enter a new size. Once again the manual that comes with HDT does a fine job of walking you through the process.
APS PowerTools...
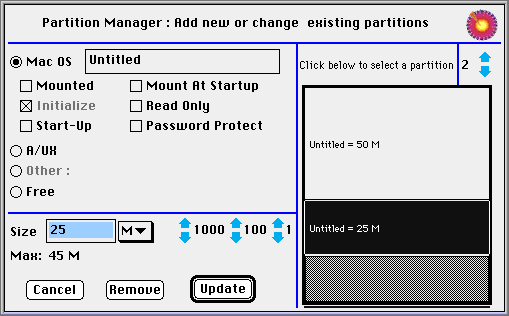
APS PowerTools has an interface that looks similar to Apple's Drive Setup but it doesn't function like it. Clicking in the gray section on the right side creates a new partition and dragging changes its size. Once again the manual covers how to partition your drive using APS PowerTools.
Drive Setup...
Drive Setup from Apple opens with a dialog listing all the SCSI devices listed in a dialog. You should recognize the volume names as the ones you have seen on your desktop while using your computer. Clicking on each device lets you know if that disk can be initialized by Drive Setup. Usually if it can't be it will tell you why. Initialization is the process where a drive is prepared to hold information. When you initialize a drive all the information on the drive is erased.
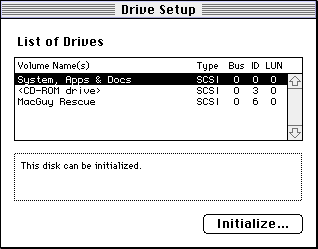
After selecting the drive you want to initialize and partition, if you are ready, you will see a message like the one above. if you get another message it is because either the drive is being used for running Drive Setup or your System software. To initialize a drive you must be started up from either your disk tools disk, your system CD, or a separate hard drive.
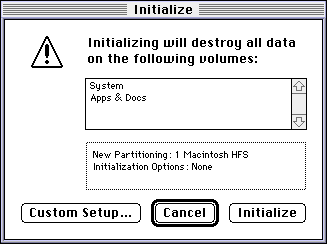
After clicking 'Initialize...' you will be presented with a dialog informing you that initializing will destroy all data on the selected drive. If you wanted to make your whole hard drive a single partition you could simply click initialize. However, since you want to partition your drive click 'Custom setup'.
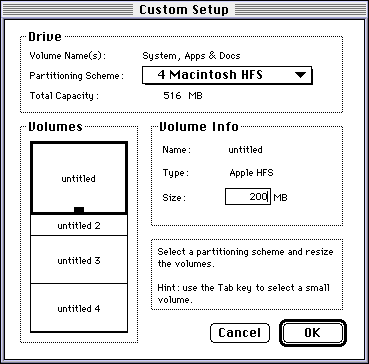
Once in Custom Setup you can make your final decisions for partitioning your drive. Notice the 'Total Capacity:', Make sure the total size of the partitions you desire to create total that number. Notice that you are able to select the number of partitions you desire to create if you hold the mouse button down on the 'Partitioning Scheme:' pop-up. After selecting the number of partitions they will appear as 'untitled', 'untitled2', etc. Don't worry you can rename them when they appear on your desktop. Clicking on the first partition will allow you to enter the size you desire for that one. Tabbing will select the next partition in line and you can enter the appropriate amounts for each partition.
After entering all the partition sizes clicking 'OK' will continue with the process. after another warning that all the data on the drive will be destroyed, Drive Setup will continue to initialize and partition your drive. Once it is all finished, all that is left is to reinstall all your software and get back to Making.
Apple's HD SC Setup functions in a similar fashion to Drive Setup.
What if I change my mind? A few of you asked about what happens if you need to make a partition larger or smaller. With the basic software from Apple (which comes with every Apple Mac) the only option is to reinitialize the drive which means erasing the drive and starting over. one of the advantages of HDT and other drive software is that some of them will allow you to make partitions larger and smaller, so if you change your mind later they will allow you to make changes by moving the information around on the drive. Anytime you are moving your data in such a manner, you risk loosing all the data contained on the drive so it is always best to have a complete backup.
Just to recap... Partitioning your drive can give you more space to work with, help you keep your files more organized, keep problems isolated from other parts of your drive, and help you be more efficient.
If this week's tip has helped you understand hard drive partitioning any better, or if you partition your drive, I'd love to hear about it. Send a message to let me know.
Tip #10 appeared December 8th 1996.
The Macintosh Guy || MacTips || Email Lists || My Blog
This site, its source code, and the MacTips logo ©1996-2016 Eric Prentice. All other names, logos and images are copyright their respective owners.