The Macintosh Guy || MacTips || Email Lists || My Blog
MacTip #29, Mac OS 8.1, My Plan of Attack.
Do it once, Do it right! Take the high road.
Mac OS 8.1 is the single most complicated update Apple has ever come out with. The single thing that makes this the case is Apple's new disk format HFS+. This MacTip walks through the important decisions to be made while upgrading to 8.1 and offers insight on how to make the transition to HFS+. Be sure to read this article in its entirety before taking any of the steps mentioned herein.
Is HFS+ for you?
The first step in preparation for Mac OS 8.1 is to decide your position on HFS+. HFS+ replaces Apple's older Hierarchical File System. A file system is simply the manner in which information is stored on your disk drive. Much of the advantages of HFS+ won't be realized until Apple updates the Mac OS to take advantage of them. So what does HFS offer you today? Largely two things, a little better performance, and more efficient use of disk space. Only Power PC based Macintoshes can use a System disk. If you have a 68040 based Mac you may want to consider using HFS+ for your applications or data.
The performance is nice but the incredible factor is HFS+' difference in how it puts files on your disk. Both HFS and HFS+ include a little open space after each file you save in case the file needs to grow in size. HFS was created back in the days when a hard drive of more than 40 or 80 megabytes was considered huge. Needless to say things have changed considerably since then. It was possible for a file on a HFS drive to have many times the size of the file in empty space wasted. The amount of this empty space increased with the size of your hard drive. HFS+ handles the ways files are written to the disk in a different manner than HFS so the empty space after each file is limited to only a small amount even for large hard drives.
It isn't unusual to reclaim a hundred megabytes or more per gigabyte of files. The amount of space reclaimed is more significant the more files you have. If you are one who works with lots of small files (like programmers, webmasters, sound editors, etc.) you may find incredible savings. A colleague of mine reclaimed over 500 megabytes from a previously full 2 gigabyte drive. If you are interested in estimating how much disk space you can reclaim, check out MacSlack.
If you are looking for reasons not to go with HFS+ there are a couple. The most notable is that it is simply too new to be reliably used for crucial data. If you have data that is of a highly sensitive nature you may want to wait for HFS+ to settle bit before diving in. Personally I keep my documents on a separate partition from my System and applications and I'm keeping it standard HFS and I'm making my other partitions HFS+ to take advantage of the added performance and more efficient disk usage.
The other drawbacks of HFS+ lie in the fact that there are not currently any disk utilities that function with HFS+ volumes except for Apple's Disk First Aid. Updates should be coming shortly but there is currently no way to repair serious disk problems or to defragment HFS+ volumes.
If you decide HFS+ isn't for you then the upgrade to 8.1 isn't significantly different from any other upgrade. If you are not going the HFS+ route check out MacTip #12 System Installs Etc. for some thoughts on system upgrades. 8.1 is a great update even if you choose not to use HFS+ at this time. Check out this page for some of the features included in 8.1.
Apple's Recommendation:
|
|
Some Thoughts about Backups
If you do decide to make at least a portion of your hard drive HFS+ you will need to back up all the essential information on your hard drive before you do anything else. There is a utility from Alsoft Inc. called PlusMaker that will convert a volume to HFS+ without erasing all the information in the process. Although this is very cool, I wouldn't recommend using any utility of that sort without first backing up all your data. So either way a full backup is an important part of your update to 8.1.
| Before my upgrade I first went through my whole hard drive and deleted any information that I didn't need. I was able to clear out a few hundred megabytes of unneeded files. It is also a good idea to go into your web browser preferences and delete the files in the cache. No need to back up anything that isn't essential.
More than likely you will need to incorporate the use of an external hard drive, network server, or removable media like a Zip drive to back up all your data. Although many backup utilities will allow you to use floppies they become really impractical when you are dealing with 50 or more megabytes of information. |
|
Formatting Your Hard Drive
After you have all the essential information from your hard drive backed up the next step is to reformat your hard drive. Reformatting your hard drive involves completely erasing your hard drive and starting from scratch. By the time you read this many of the more popular disk utilities have been updated to support Mac OS 8.1 and HFS+. If you use one of these utilities be sure that the version you have is compatible before proceeding.
![]()
![]()
![]() Before you take the time to deal with getting the latest version of your particular disk utility you might want to look into another option. Apple has updated Drive Setup to version 1.4. In the past (1.2 and before) Drive Setup has only functioned with newer Apple hard drive. With the release of 1.3 Apple opened it up to some select non-Apple hard drives. Drive Setup 1.4 now supports even more hard drives. I was happy to find that my 2 gig drive was now supported with 1.4 that wasn't previously supported with 1.3.
Before you take the time to deal with getting the latest version of your particular disk utility you might want to look into another option. Apple has updated Drive Setup to version 1.4. In the past (1.2 and before) Drive Setup has only functioned with newer Apple hard drive. With the release of 1.3 Apple opened it up to some select non-Apple hard drives. Drive Setup 1.4 now supports even more hard drives. I was happy to find that my 2 gig drive was now supported with 1.4 that wasn't previously supported with 1.3.
![]() Personally I will always use Apple's Drive Setup when I have the opportunity. Apple's utility is designed by those who know the most about Apple software and is tested more thoroughly than any other. I have never had any trouble related to using Drive Setup on a particular drive, I can't say that about all of the third party drive software I've used.
Personally I will always use Apple's Drive Setup when I have the opportunity. Apple's utility is designed by those who know the most about Apple software and is tested more thoroughly than any other. I have never had any trouble related to using Drive Setup on a particular drive, I can't say that about all of the third party drive software I've used.
When you get to the point of reformatting your hard drive you need to consider what sort of partitioning scheme you want to use. Although HFS+ deals with the limitation of HFS in more efficiently using disk space there are still compelling reasons to separate your hard drive into multiple partitions. Check out MacTips #10 Hard Drive Partitioning, Part 1  Hard Drive Partitioning, Part 2 for some of the rationale behind partitioning.
My Standard Partitioning Format'System 'Volume (HFS+) about 200 megabytes. 'Applications' Volume (HFS+) as much as I need. 'Documents' Volume (HFS) about 250 megabytes. and If I have extra space, 'Scratch 'Volume (HFS+) the rest. |
If you are using Drive Setup to reformat your drive the following steps may be of assistance.
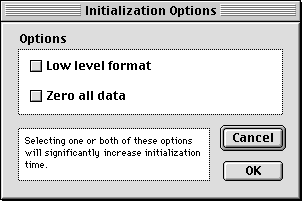
 There are two options I check every time I format a hard drive. They both provide a little extra assurance of the integrity of your drive and ensure that nothing that might be causing you problems now will be around when you are done. Under the 'Functions' menu in Drive Setup you will find 'Initialization Options...' Checking both 'Zero All Data' and 'Low Level Format' will leave you with a clean, well tested drive on which to continue with installation.
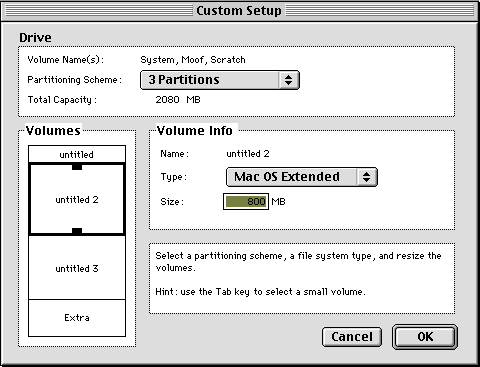
Once you have decided how you want to partition your hard drive select your hard drive from the list and click 'Initialize...'. If you are going to be partitioning your drive click 'Custom Setup...' in the next dialog. The next thing to do is to select a 'Partitioning Scheme' that coincides with the number of partitions you want to create. You can then click on each one, adjusting the 'Size' to fit what you desire. As you are entering the sizes you can also change the 'Type' pop up to reflect weather you want the 'Mac OS Standard' HFS file structure, (like my Documents volume) or 'Mac OS Extended' HFS+.
Note: Be sure not to change any of the other 'Volumes' to 'Mac OS Extended' or your initialization may fail. Those other volumes can only be accessed by pressing the 'Tab' key. Only change the 'Untitled Volumes to 'Mac OS Extended'.
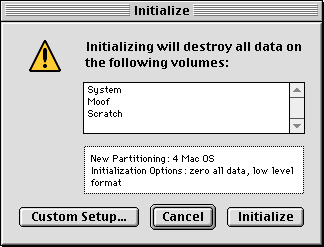
 Clicking 'OK' will take you back to the 'Initialize' dialog where you can click 'Initialize' to begin the initialization process. This will eliminate all the information from your drive so be sure there isn't any crucial data before you continue.
After the initialization is complete each partition will be named 'Untitled' with a number indicating the second and following partitions. This would be as good a time as any to change those names to ones that mean something to you.
Putting Your Information Back on Your Hard Drive.
![]()
![]()
![]() Installing System software. The first thing to consider when looking at putting a system back on your hard drive is whether you want to install a new one (Clean Install) or if you want to update your current system. The safest is to do a clean install. If you have any questions of the stability or integrity of your current system folder save yourself he trouble and do a clean install. it will be worth the time.
Installing System software. The first thing to consider when looking at putting a system back on your hard drive is whether you want to install a new one (Clean Install) or if you want to update your current system. The safest is to do a clean install. If you have any questions of the stability or integrity of your current system folder save yourself he trouble and do a clean install. it will be worth the time.
Once you have either restored your backed up System or installed a clean one you should next do the upgrade to 8.1. Remember, if you don't install 8.1 you won't be able to access HFS+ volumes.
![]() After your System installation is complete the next step is to restart from your new system. If you have upgraded your current system I recommend that the first time you start in Mac OS 8.1 you do so with the space bar down. This will bring the Extension manager to the foreground early in the startup process. Choose the 'Set' 'Mac OS 8.1 All' so that all your third party extensions and control panels will be disabled. This way you will be sure that everything is installed properly. The next thing will be to enable all the disabled extensions and control panels in a manner where you will be able to tell if one of them doesn't play well with Mac OS 8.1. It wouldn't be a bad idea to be a little proactive in checking with those companies to see if you require any updates for Mac OS 8.1 compatibility.
After your System installation is complete the next step is to restart from your new system. If you have upgraded your current system I recommend that the first time you start in Mac OS 8.1 you do so with the space bar down. This will bring the Extension manager to the foreground early in the startup process. Choose the 'Set' 'Mac OS 8.1 All' so that all your third party extensions and control panels will be disabled. This way you will be sure that everything is installed properly. The next thing will be to enable all the disabled extensions and control panels in a manner where you will be able to tell if one of them doesn't play well with Mac OS 8.1. It wouldn't be a bad idea to be a little proactive in checking with those companies to see if you require any updates for Mac OS 8.1 compatibility.
After you have a functional System you just need to restore your backed up data to the correct spot and you are finished. Keep in mind that the process may have invalidated some of the aliases contained within your restored hard drive may have become invalid and will need to be recreated.
If you are looking for a concise list of steps installing 8.1 and moving to HFS+ I've created the following just for you.
10 steps to install 8.1 with HFS+ with only a floppy disk, Mac OS 8 CD and an internet connection.
|
Moving Forward...
Both Mac OS 8.1 and HFS+ are still very new. Frequent backups are recommended during this stabilization period. Also check out the Mac OS 8.1 Special Report by MacFixIt, MRP and MacInTouch for compatibility updates and late breaking issues. Also be aware that 8.1 doesn't contain all the updates for Mac OS 8. Stop by Eight.Six-Plus for the only one stop spot for all updates to Mac OS 8 including 8.1 and Macintosh Runtime For Java 2.0.
I hope this helps with your migration to Mac OS 8.1 and HFS+.
Eric Prentice
The Macintosh Guy || MacTips || Email Lists || My Blog
This site, its source code, and the MacTips logo ©1996-2016 Eric Prentice. All other names, logos and images are copyright their respective owners.
 If you decide to go with HFS+ you will need to go through a few hoops to get 8.1 installed on an HFS+ formatted hard drive. Apple recommends against installing 8.1 on a HFS+ volume unless you have the 8.1 CD. The primary reason for this is that the only version of the Mac OS that can read HFS+ is 8.1. If you startup your Mac from a Mac OS 8 system disk your HFS+ volumes will only contain a read me file explaining that you can't see the files unless you are booted from Mac OS 8.1. Although the Mac OS 8.1 CD will be very handy in working with and installing 8.1 it is not necessary. The best option is to setup a Zip, or other removable media drive as a Mac OS 8.1 boot disk. If you have another hard disk it will work just as well. This will provide you with the security of being able to access your information in the event that the system on your hard drive became unreadable. Simply perform a clean installation of the Mac OS 8 system software onto the removable disk and then update it to 8.1. If you do create a secondary startup disk it would be a great idea to put the 8.1 update on it too so you will have easy access to it at any time.